ETS configuration of interface
- Wolfgang Granzer
Interface settings with ETS
The NETx KNX IP Secure Interface serves as a programming interface. The ETS can use this function to establish a connection via IP to the respective TP line.
Within the ETS, KNX interfaces can be selected and set up via the ETS menu "Bus Interfaces".
The ETS can access configured KNX IP Interfaces even without a database entry. If the setup of the KNX IP Interface does not comply with the conditions of the KNX installation it must be configured via an ETS project. See the ETS database section for more information.
If security mode is activated in the KNX IP Interface, a password is required to establish a connection.
As factory default the assignment of the IP address is set to “automatically via DHCP” and thus no further settings are necessary. To use this feature a DHCP server on the LAN must exist (e.g. many DSL routers have an integrated DHCP server).
If the KNX IP interface has been connected to the LAN and has a valid IP address, it should appear automatically in the menu item "Bus" under "Discovered interfaces".
By clicking on the discovered interface it is selected as the current interface. On the right side of the ETS window all specific information and options of the connection appear.
The indicated device name and the "Host Individual Address" (individual address of the device) can only be changed within your ETS project then.
Like all programmable KNX devices the NETx KNX IP Secure Interface has an individual address which can be used to access the device. This is used, for example, of the ETS when downloading to the KNX IP Interface via the bus.
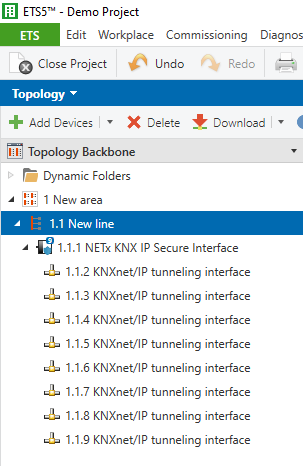
For the interface function the device contains additional individual addresses that can be set in the ETS. When a client (e.g. ETS) sends via the KNX IP Interface telegrams to the bus, they contain a sender address as one from the additional addresses. Each address is associated with a connection. Thus response telegrams can be clearly transmitted to the respective client. The additional individual addresses must be selected from the address range of the bus line in which the interface is installed and may not be used by another device.
Example:
- Device address 1.1.10 (address within ETS topology)
- Connection 1 1.1.240 (1. additional address)
- Connection 2 1.1.241 (2. additional address)
- Connection 3 1.1.242 (3. additional address)
- Connection 4 1.1.243 (4. additional address)
- Connection 5 1.1.244 (5. additional address)
- Connection 6 1.1.245 (6. additional address)
- Connection 7 1.1.246 (7. additional address)
- Connection 8 1.1.247 (8. additional address)
The section “Individual Address” enables you to select the individual KNX address of the currently used KNXnet/IP tunneling connection.
The individual KNX device address and the individual KNX addresses for additional tunneling connections can be changed within the ETS project, after the device has been added to the project.
ETS database
The ETS database (ETS 5.7 or higher) can be downloaded via the KNX online catalog.

If the first product is inserted into a project with KNX Security, the ETS prompts you to enter a project password.
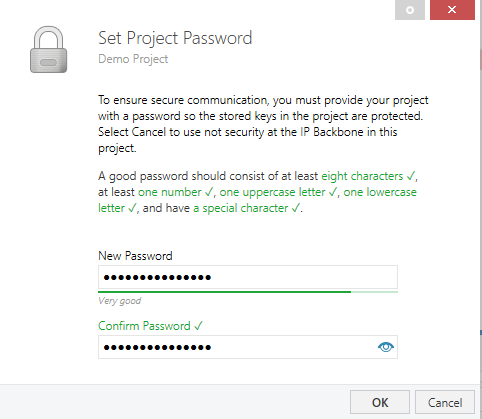
This password protects the ETS project from unauthorized access. This password is not a key that is used for KNX communication. The entry of the password can be bypassed with "Cancel", but this is not recommended for security reasons.
ETS requires a device certificate for each device with KNX Security that is created in the ETS. This certificate contains the serial number of the device as well as an intangible key (FDSK = Factory Default Setup Key).
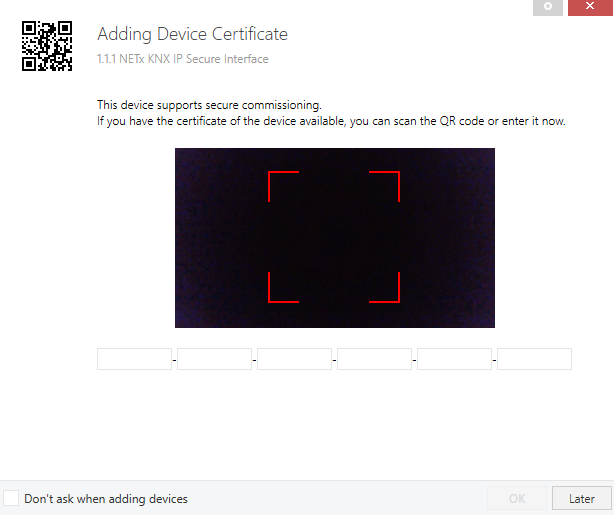
The certificate is printed as text on the device. It can also be conveniently scanned from the printed QR code via a webcam.
The list of all device certificates can be managed in the ETS Overview - Projects - Security window.
This initial key is required to safely put a device into operation from the start. Even if the ETS download is recorded by a third party, the third party has no access to the secured devices afterwards. During the first secure download, the initial key is replaced by the ETS with a new key that is generated individually for each device.
This prevents persons or devices who may know the initial key from accessing the device. The initial key is only reactivated after a master reset.
The serial number in the certificate enables the ETS to assign the correct key to a device during a download.
In the ETS, some settings are displayed in addition to the parameter dialog in the properties dialog (at the edge of the screen). The IP settings can be made here. The additional addresses for the interface connections are displayed in the topology view.
Each individual KNX address can be changed by clicking on the list entry and typing in the desired address into the "Individual Address" text field. If the text field frame switches to color red after entering the address, the address is already taken within your ETS project.
Make sure that none of the addresses above are already present in your KNX installation.
By clicking on the device entry within your ETS projects topology view, an information column "Properties" will appear on the right side of the ETS window. Within the "Settings" overview, you can change the name of the device.
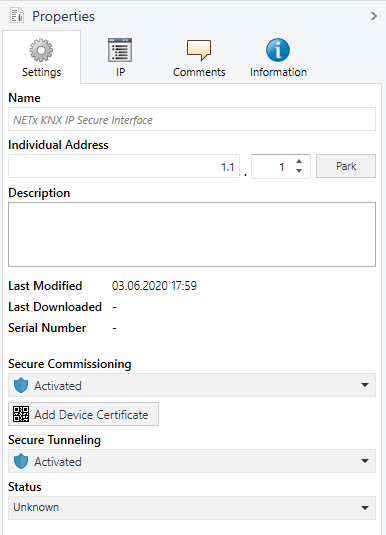
If secure tunneling is activated, a unique password will be created automatically for each tunnel. These passwords can be displayed under the "Settings" overview, when a tunnel is selected.

Within the "IP" overview the IP network specific options of the router can be changed.
By changing "Obtain an IP address automatically (via DHCP)" to "Use a static IP address" (static IP address) the IP address, subnet mask, and default gateway can be set freely.
All changes in the properties menu become effective only after a successful application download.

| Parameter | Description |
|---|---|
| IP address | Here the IP address of the NETx KNX IP Secure Router can be entered. This is used to address the device via the IP network (LAN). The IP addressing should be coordinated with the administrator of the network. |
| Subnet mask | Enter the subnet mask here. The device uses the values entered in this mask to determine whether there is a communication partner in the local network. If there is no partner in the local network, the device will not send the telegrams directly to the partner but to the gateway that routes the telegram. |
| Default gateway | Enter the IP address of the gateway here, e.g. the DSL router of the installation. |
Example of assigning IP addresses:
A PC is to be used to access the NETx KNX IP Secure Interface.
- IP address of the PC: 192.168.0.30
- Subnet of the PC: 255.255.255.0
The NETx KNX IP Secure Interface is located in the same LAN, i.e. it uses the same subnet. The subnet constrains the IP addresses that can be assigned. In this example, the IP address of the KNX IP interface must be 192.168.0.xx, where xx can be a number from 1 to 254 (with the exception of 30, which is already taken by the client PC). It must be ensured that no IP addresses are assigned twice.
- IP address of the KNX IP Router 192.168.0.10
- Subnet of the KNX IP Router: 255.255.255.0
ETS parameter dialogue
The following parameters can be set using the ETS.
General settings

| Parameter | Description |
|---|---|
| Prog. mode on device front | In addition to the normal programming button ❸ the device allows activating the programming mode on the device front without opening the switchboard cover. The programming mode can be activated and deactivated via pressing simultaneously This feature can be enabled and disabled via the parameter "Prog. mode on device front". The recessed programming button ❸ (next to the Programming LED ❷) is always enabled and not influenced by this parameter. |
| Manual operation on device | The manual operation of the NETx KNX IP Secure Interface only contains the status display. This parameter sets the duration of the manual mode. Upon completion the normal display mode is restored |
Programming
The NETx KNX IP Interface can be programmed in different ways by the ETS:
Via KNX Bus
The device only needs to be connected to the KNX bus. The ETS requires an additional interface (for example, USB) to have access to the bus. Via this way both the individual address and the entire application including IP configuration can be programmed. Programming via the bus is recommended if no IP connection can be established.
Via KNXnet/IP Tunneling
No additional interface is required. Programming via KNXnet/IP Tunneling is possible if the device already has a valid IP configuration (e.g. via DHCP). In this case the device is displayed in the interface configuration of the ETS and must be selected. The download is executed via the ETS project as with many other devices.
Via direct IP connection
While KNXnet/IP Tunneling and KNXnet/IP Routing is limited to the speed of KNX TP the device can be loaded via a direct IP connection at high speed. The direct IP connection is possible if the device already has a valid IP configuration as well as an individual address. To do this select "Use direct IP connection if available" in the ETS menu "Bus – Connections - Options". The download is then directly performed in the device and is not visible in the ETS group monitor.
